I got a ping from my colleague May Flaum asking if I would contribute to this week's Simon Says Stamp and Show Challenge. I thought for about 2 seconds before yelling "YES". So this week I am appearing on the blog's Metal-ology Challenge.
And that's not all! Submit your own answer to the Metal Challenge and you could win a $50 voucher to Simon Says Stamp. So let's get metalized!


Paper is turned to metal, and metal is turned to paper is this fabulous Easter piece. Just the size for a card for that special Easter someone, or to sit on the shelf for Easter brunch. The panels are each 2.5"x3" embossed metal that has been painted, sanded and inked to look like Victorian wallpaper.

I first embossed metal sheets by using my Big Kick and an embossing folder from Tim Holtz’s Alterations. Next I covered them with a light coat of white acrylic and set aside to dry.Once the paint was dry I did a little scuffing and sanding to expose a little of the metal.

Then I used Walnut Stain and Tumbled Glass Distress Inks to tint the panels. I worked lightly, doing the Walnut first and letting it set for several minutes. Then I pressed the Tumbled Glass ink pad directly onto the panels to add the blue tint, and smeared a bit with my finger tips for a more worn look.

Glass Glitter is chunky and comes in beautiful vintage colors. Just the thing to fill a special bottle of Easter joy.

This little chocolate bunny is made from a bit of "Hope" from Authentique Papers. The bunn is edged in Walnut Stain Distress Ink and coated in Crystal Fine Glitter. Some vintage tinsel for his bow and he's good enough to eat!

I used lots of different things to link the panels - paper clips, jump rings, paper hinges and twine. Why use the same thing on every hinge? Mixing it up adds lots of interest.

These metal letters are actually painted chipboard! I love this look of copper patina, and worked out this very simple technique to transform any chipboard or heavy paper into “copper”.

First I dabbed chipboard letters with my copper Acrylic Paint Dabber, being sure to leave chipboard exposed. It’s really important to leave some areas clear of the paint because….
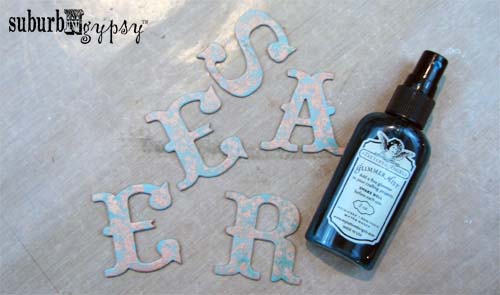
After the paint dried I spritzed the letters with Turquoise Blue Glimmer Mist. All of the unpainted areas now turned blue-green, like the copper patina. The blue-green color also layers over the copper, dulling it just a touch to antique it.
Are you inspired now??? You better be! Now get your art on, and when you've got something fabulously metallic to share, submit it on the Simon Says Stamp and Show Challenge. The Simon Says Stamp Superstore is giving away a $50 voucher to one luck random participant. So what are you waiting for?!
Oh and before you go, don't forget your supplies!
Oh and before you go, don't forget your supplies!
Copper Acrylic Paint Dabber - Ranger
Turquoise Blue Glimmer Mist - Tattered Angels
Hope Collection - Authentique Paper
Glass Glitter - Melissa Frances
Crystal Fine Glitter - Martha Stewart Crafts
Mini Paper Clips, Jump Rings, Foliage, Game Spinners - Idea-ology by Tim Holtz
What a super tutorial! Love this project! Thank you for sharing! And for guesting with us! Hugs, Sandra
ReplyDeletethanks for having me sandra i was so excited to join you all this week!
DeleteBeautiful piece!!! Wonderful tutorial!
ReplyDeletethank you nicie - i hope you give it a try!
DeleteWOW... it sent chills through me... that is so, so stunning ( that's not the right word... I can't find one right now), I LOVE IT !
ReplyDeletethanks so much! stop by again!!
DeleteWhat a fabulous project... your shabby chic metal panels are absolutely beautiful, and I love all the varied details on each panel and joining them up - just brilliant! Congrats on guesting at SSSaS - can see why they wanted you!
ReplyDeleteAlison x
thank you alison i loved it!
Deleteomg.. love this so much.. tq for sharing the tutorial :)
ReplyDelete