Showing posts with label authentique. Show all posts

Thursday, December 26, 2013

Where the heck have I been!?


Hello Gypsies!

It’s been forever since I’ve been able to spend time crafting and blogging. The challenges of real life, real job, and real-world commitments became pretty darn overwhelming this past year. But I’ve made a pledge to put myself first a little more for the new year, and I’m starting here with my blog.

Way more than a year ago I made my very first video tutorial – Paper Chain Mania! It was a blast to make and lots of  fun to watch, so I’ve dusted it off for the blog today. Hi to my peeps at Authentique Paper, who featured this video as part of their Xmas in July blog last year.


Some people were curious about how I shot the video. Here’s my high-tech video studio. Note the iTouch perched on a stick – very sophisticated!


The papers I used in this video are Xmas colors, but you can easily substitute gold and silver for some festive New Year’s Eve decorations. Paper chains are a great substitute for streamers at birthday parties and can make quick garlands to dress up a simple get-together.

Check out the video for all the steps, then grab some paper strips, your stapler and maybe a little champagne and get yourself chained up!


Friday, March 15, 2013

'Grace'ful Daisy


In November, we lost our beloved Saint Bernard, Daisy, to stomach cancer. Many of you may recognize Daisy - she has been featured in some projects here for Authentique Paper.
And she frequently tried to art direct me while making them.
When it came time to set her free, the staff at the hospital made a cast of her paw. I've wanted to do something with it, to create some way to remember my special girl. I finally was ready this month, and I chose Authentique's new "Grace" line.
Daisy was not graceful by any means. But her personality was sunny and warm and lovely. 
I love the color combinations in this collection. Lots of pinks and greens and an awesome carmel - or Saint Bernard - brown. Look closely and you'll see the edges of the papers are all torn and inked to enhance the distressed look of the paper - the paper has a great weight to it that stands up to all kinds of tearing, sanding and inking.

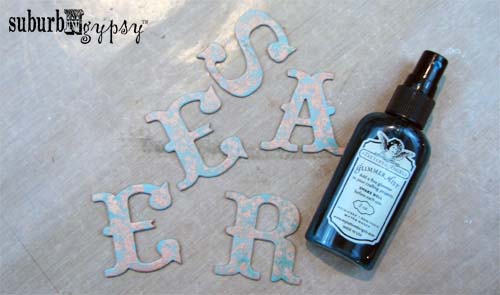
Look even closer, and you'll see the letter "D" is covered with a piece of "Grace". Creating your own coordinating chipboard letters is an easy trick! - See my step-by-step below.
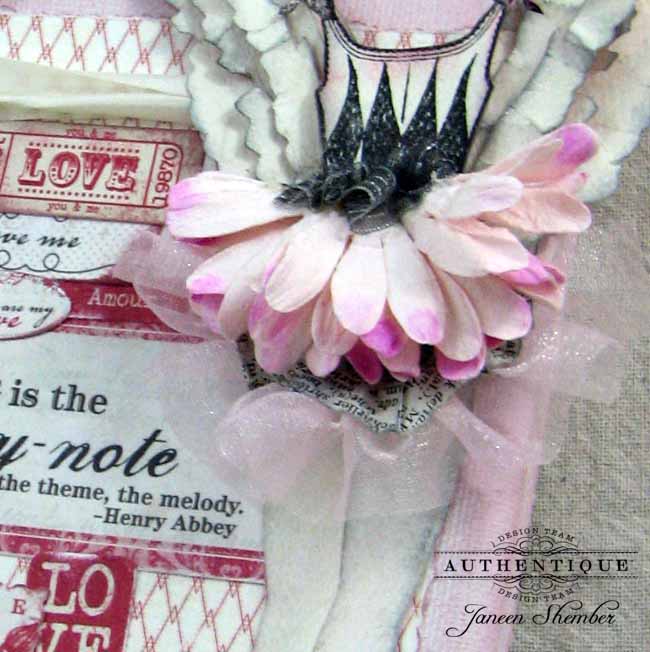
Our girl's pawprint sits nicely along with my favorite photo of her. Paper grass edging reminds me of her love of a good roll on the lawn. The tattered rose reminds me of how she would always insist on laying under "her" rose bush, regardless of thorns. The daisies remind me of her sunny, spunky personality, and her weird habit of smelling flowers in the garden!

In January we adopted Loki, a two year old Saint Bernard. He's fitting in quite nicely and is already trying to "help" me in my crafting corner. I'm sure he'll be featured on something very soon. 
In the meantime, I thought I'd share how to make your own coordinating chipboard letters so you can enjoy customizing your projects and layouts, and find a great way to use up those odds and ends!
~
Custom Letters in 4 Easy Steps!

I have tons of chipboard letters for paper collections that have been completely used up. So I started turning them into matchable letters to go along with whatever papers I'm using.

It's so easy, are you ready?

Step 1 - Assemble your papers, letters, Glue N Seal, and Xacto knife.


Step 2 - Apply a thin coat of Glue N Seal to the front of each letter and set onto your paper. Remember that the letter's "front" needs to go face-down so you get the paper you want on the front of the letter.

Step 3 - Cut out the letters. I use scissors to do most of the cutting, then use the Xacto knife for the intricate cutting. Don't worry if it's not perfect, because...

Step 4 - Sand the edges of the letters. I use a sanding block, and also an emory board for the tighter spots. 

And there you go! 'Grace'ful letters to go along with the whole collection.

~ Materials Used ~
"Grace" collection from Authentique Paper
"Spun Sugar" and "Victorian Velvet" Distress Inks - Ranger
Glue N Seal - Inkssentials

Tuesday, February 19, 2013

Heavy Metal Easter - Tutorial


I got a ping from my colleague May Flaum asking if I would contribute to this week's Simon Says Stamp and Show Challenge. I thought for about 2 seconds before yelling "YES". So this week I am appearing on the blog's Metal-ology Challenge.

And that's not all! Submit your own answer to the Metal Challenge and you could win a $50 voucher to Simon Says Stamp. So let's get metalized!


Paper is turned to metal, and metal is turned to paper is this fabulous Easter piece. Just the size for a card for that special Easter someone, or to sit on the shelf for Easter brunch. The panels are each 2.5"x3" embossed metal that has been painted, sanded and inked to look like Victorian wallpaper.


I first embossed metal sheets by using my Big Kick and an embossing folder from Tim Holtz’s Alterations. Next I covered them with a light coat of white acrylic and set aside to dry.Once the paint was dry I did a little scuffing and sanding to expose a little of the metal. 


Then I used Walnut Stain and Tumbled Glass Distress Inks to tint the panels. I worked lightly, doing the Walnut first and letting it set for several minutes. Then I pressed the Tumbled Glass ink pad directly onto the panels to add the blue tint, and smeared a bit with my finger tips for a more worn look.


Glass Glitter is chunky and comes in beautiful vintage colors. Just the thing to fill a special bottle of Easter joy.


This little chocolate bunny is made from a bit of "Hope" from Authentique Papers. The bunn is edged in Walnut Stain Distress Ink and coated in Crystal Fine Glitter. Some vintage tinsel for his bow and he's good enough to eat!


I used lots of different things to link the panels - paper clips, jump rings, paper hinges and twine. Why use the same thing on every hinge? Mixing it up adds lots of interest.


These metal letters are actually painted chipboard! I love this look of copper patina, and worked out this very simple technique to transform any chipboard or heavy paper into “copper”.


First I dabbed chipboard letters with my copper Acrylic Paint Dabber, being sure to leave chipboard exposed. It’s really important to leave some areas clear of the paint because….


After the paint dried I spritzed the letters with Turquoise Blue Glimmer Mist. All of the unpainted areas now turned blue-green, like the copper patina. The blue-green color also layers over the copper, dulling it just a touch to antique it.

Are you inspired now??? You better be! Now get your art on, and when you've got something fabulously metallic to share, submit it on the Simon Says Stamp and Show Challenge. The Simon Says Stamp Superstore is giving away a $50 voucher to one luck random participant. So what are you waiting for?!

Oh and before you go, don't forget your supplies

Tim Holtz Damask & Regal Flourishes Texture Fades Embossing Folders - SizzixTumbled Glass and Walnut Stain Distress Inks - Ranger
Copper Acrylic Paint Dabber - Ranger
Turquoise Blue Glimmer Mist - Tattered Angels
Hope Collection - Authentique Paper
Glass Glitter - Melissa Frances
Crystal Fine Glitter - Martha Stewart Crafts
Mini Paper Clips, Jump Rings, Foliage, Game Spinners - Idea-ology by Tim Holtz
  

Sunday, February 17, 2013

Heavy Metal Easter

I got a ping from my colleague May Flaum asking if I would contribute to this week's Simon Says Stamp and Show Challenge. I thought for about 2 seconds before yelling "YES". So this week I am appearing on the blog's Metal-ology Challenge.

And that's not all! Submit your own answer to the Metal Challenge and you could win a $50 voucher to Simon Says Stamp. So let's get metalized!


Paper is turned to metal, and metal is turned to paper is this fabulous Easter piece. Just the size for a card for that special Easter someone, or to sit on the shelf for Easter brunch. 


The panels are each 2.5"x3" embossed metal that has been painted, sanded and inked to look like Victorian wallpaper.


Glass Glitter is chunky and comes in beautiful vintage colors. Just the thing to fill a special bottle of Easter joy.


This little chocolate bunny is made from a bit of "Hope" from Authentique Papers. The bunn is edged in Walnut Stain Distress Ink and coated in Crystal Fine Glitter. Some vintage tinsel for his bow and he's good enough to eat!


I used lots of different things to link the panels - paper clips, jump rings, paper hinges and twine. Why use the same thing on every hinge? Mixing it up adds lots of interest.


The "copper" letters are not what they appear to be. Curious??
Come back on Wed for the how-tos and what-nots to make your own metal letters and panels.

Are you inspired now??? You better be! Now get your art on, and when you've got something fabulously metallic to share, submit it on the Simon Says Stamp and Show Challenge. The Simon Says Stamp Superstore is giving away a $50 voucher to one luck random participant. So what are you waiting for?!

Oh and before you go, don't forget your supplies

Tim Holtz Damask & Regal Flourishes Texture Fades Embossing Folders - SizzixTumbled Glass and Walnut Stain Distress Inks - Ranger
Copper Acrylic Paint Dabber - Ranger
Turquoise Blue Glimmer Mist - Tattered Angels
Hope Collection - Authentique Paper
Glass Glitter - Melissa Frances
Crystal Fine Glitter - Martha Stewart Crafts
Mini Paper Clips, Jump Rings, Foliage, Game Spinners - Idea-ology by Tim Holtz
  

Friday, February 1, 2013

Love is the Key


There's something special in the air these days. Some of you say "snow?", some of you say "hail?"
 I say "LOVE".
As in Authentique's "Lovely". And to celebrate the loveliness, I created a tiny canvas of paper and some wonderful flowers from Petaloo and trims from May Arts. We are all doing a cross-promo this week and here's my little contribution.


The canvas is 5x7", and I "painted" it with Victorial Velvet Distress Ink. I rubbed the ink on the canvas's edges, then used a paper towel to smear and fill in the canvas with color.


After I stamped and fancy-cut the wings, legs and top, I created the tutu with layers of ribbon, book pages, and Petaloo's Darjeeling flowers. More ribbon wraps the canvas and holds the key.


 I also love love love the tiny hat pins from Petaloo. Adorably small, and perfectly pink, I used a beaded and a silver pin in the top corner.


I hope you've enjoyed this little bit of loveliness. Don't forget to stop by Authentique and Petaloo all this week for more creativity!

Materials Used
"Lovely" by Authentique
"Darjeeling Flowers" by Petaloo
Ribbons by May Arts
Distress Ink by Ranger

Monday, November 12, 2012

Love builds a garden.

Authentique is debuted its newest collection on Friday. It's all about love, and PINK. I made this project as a part of our Authentique-LoveMyTapes cross-promo last week and wanted to share it with you here.


I created the flowers with a couple of different techniques. For all of the flowers, I covered one side of a square of paper with washi tape - sometimes I covered the whole paper, sometimes I left stripes of paper for added texture. For the daisies and other petal forms, I used the "Tattered Flowers" die from Sizzix. For the roses, I used my favorite cut and twirl technique.For added texture and shine, I spritz some of the flowers with Goosebumps Shimmer Texture Spray.


I used more washi tape to create the stems - twisting it around florist's wire, and wrapping leaves in as I went.


Authentique always creates fabulous sticker sheets to coordinate with the papers, and I used the trims to decorate the jar. Washi tape twisted around itself creates great twine. 


I had a great time playing with tape - it's something I haven't tried before and it's a great product! So versatile and easy to work with. Be sure to visit the Love My Tape site to see what their design team is making with our papers.

~ Products Used ~
"Lovely" - Authentique
Washi tapes #880, #383 - Love My Tape
Tattered Flowers and Mini Leaves dies - Sizzix
Goosebumps - Imagine Crafts

Thursday, November 8, 2012

Going to the dogs...

Today is my turn to join the fabulous Authentique-Canvas Corp. Blog Hop. I'm so excited to share this project with you today, which literally.....went to the dog!

Daisy is my special Saint. She's got the best expressions, and she's such an original. Which means she's perfect for Authentique's "Original Collection".
To create the shadowbox effect, I used the backside of the "Stretched Canvas" and "Stretched Burlap" mini-canvases, and covered the edges with paper and more burlap. 
For the roses, I cut a circle of burlap, and used the pre-made "Canvas Minis" circles. I cut a spiral in each and twirled away. The leaves are cut from more burlap, free-hand.
To create the burlap ruffle, I took 1" wide strips cut from a 12x12 "Burlap Fabricpage" and crunched and glued them around the edge of the canvas back.

~ Products Used ~
"Original" - Authentique Paper
12x12 Burlap Fabricpage
6x6 and 2x2 Stretched Canvas
4x4 Stretched Burlap
Burlap Minis rectangles
Canvas Minis circles
1 Authentic Saint Bernard

Monday, October 29, 2012

Off to the pumpkin patch


Happy Monday everyone! It's been a while since I've posted - life sometimes throws us curve balls. But things are settling down now and it's time to get crackin! Below is my post for Authentique's "Pinspired Monday" - today's project was a lot of fun to create, and I hope it inspires you to created some seasonal fun!
~ Pinspired Monday ~

My project today was inspired by my love of Halloween, and especially pumpkins!

And my Pinspiration was this wonderful paper pumpkin from whipperberry

So off I went to my paper stash and pulled out "Enchanted" and go to work.

I loved how simple this project really was. Wet paper strips, twist into sticks and let set. For the thinner strips I twisted the paper around florist's wire for more strength. The great thing is that Authentique's paper is nice and thick, so water is all that's needed to make it pliable and to "set". Other sites used ModgePodge for this project but I didn't need it! 

Once all the paper twists were ready, I pulled out the hot glue gun and started attaching the twists to a stem. Round and round and some singed fingertips later and I was done! The curly stems are paper wrapped around florist wire, then twisted around a pen for better curl.

I hope you are inspired to create your own magic pumpkin this Halloween. And don't forget that pumpkins are great for Thanksgiving too, and "Thankfully" Authentique has the perfect paper for that too!

~ Products used ~
Enchanted paper collection

Monday, September 3, 2012

Pinspired Haunted Treehouse

Halloween is my absolute favorite holiday. Ghosties, goblins, bat and cats, boney feet and witches hats. Who can resist?? Not me!

Authentique has started a "Pinspired Monday" series, where each designer finds inspiration on Pinterest, and uses it to create a project. So off I went to Pinterest and this is what I found - a haunted house!


Which led me to create...
a haunted treehouse!

The treehouse itself is built with a Configuration cabinet, lined with papers from our Enchanted line. Once the sections are covered in paper and the edges covered with paper tape the real fun begins - creating each scene!

The Apothecary's Shoppe is my favorite. I loved mixing potions and poisons for these tiny bottles.


All of the potion bottles have labels made with stickers from the Enchanted collection.  
I used a combination of different things to fill each one. 

~ Allow 24 hours for the bottles that use Glossy Accent in them to set properly. ~
~ Sand and distress the stickers before adhering them to the bottles for extra creepiness ~ 
~ Rub ink on the corks to make those look older too ~

~ Potion Recipes ~

"Poison"
"Slate" alcohol ink
Glossy Accent
cat litter
~ pour a small amount of Glossy Accent in the bottle and add cat litter. 
~ twist and turn the bottle to mix and coat the inside of the glass
~ add a few drops of alcohol ink
~ twist and turn the bottle to mix
~ set bottle on its side to set, occasionally turning the bottle to remix and smear the sides

"Witch's Brew" 
"Red Pepper" alcohol ink
Glossy Accent
~ pour a small amount of Glossy Accent in the bottle
~ add a few drops of alcohol ink
~ twist and turn the bottle to mix
~ set bottle on its side to set, occasionally turning the bottle to remix and smear the sides

"Eye of Spider"
Black Sparkly Fluff
~ tip a small amount of Sparkly Fluff into the bottle 

"Beware" vapor
"Meadow" alcohol ink
cotton ball
~ add a few drops of alcohol ink
~ twist and turn the bottle to coat the sides of the bottle
~ put a small amount of glue on the inside lip of the bottle
~ attach a small amount of cotton from the cotton ball
~ hold in place and lightly pull to make wisps

~ Products Used ~
Paper - Enchanted - Authentique
Configuration Cabinet - Tim Holtz
Wooden Tree - Kaisercraft
Black acrylic paint
Black embossing powder
Assorted tiny bottles with corks
Bird Cage - Idea-ology
Crows
Skeleton

Friday, August 17, 2012

hickory dickory dock!


this week authentique paper and basically bare are having a little get-together. i received some really whimsical kits from basically bare and was immediately inspired to create a special nursery canvas.


i started with a 9x12 canvas board and painted the edges with brown acrylic. then i tore and roughed up a sheet from authentique's "lively" collection and glued it in place.

the clock and owl are kits from basically bare. i used glue&seal to adhere papers to the bare pieces, then sanded the edges. a little bling and "hootie" the owl is ready to sigh, "there he goes".


i have lots of chipboard letters that belong to different paper collections, none of which matched the papers. so i chose the letters for the title, painted them all with brown acrylic and then flocked them with brown "sparkly fluff" from the craft lounge.


there goes that mouse again...
i used a piece from basically bare's flower kit to create the mouse. a googly eye and a curly wire tail and he's off and running.


thanks for stopping by the caravan today and be sure to stop by again!

~ materials ~
basically bare - clock, owl and flower kits
authentique paper - "lively" collection
the craft lounge - sparkly fluff
bits of this and that