Showing posts with label so knotty. Show all posts

Friday, December 9, 2011

tim tag mania! #1

so it's xmas, and evidently that means that tim holtz creates his "12 tags of christmas", and everyone else goes crazy. it's really amazing to watch. every day mario rossi starts tweeting behind the scenes shots and commentaries on that day's tag. we get peeks and teasers of what the tag will look like, and we build up to the big reveal at midnight. people challenge each other to post first on the tim blog, and this year we're able to post our own tags on tim's blog, to show off our own inspired spin on his idea.

it's a friggin party every night!

i didn't realize how crazy devoted tim fans are, and since i'm one of them, i think it only fair that i coin a new "gypsy jargon".

timaniacs - n. a person who stays up until midnight to get the first look at a tim tag, after spending several hours following on twitter, making shopping lists for the next day, and trying to be the first to post a comment when the tag goes live at midnight.

bonus jargon:

timania - n. state of being one with the timaniacs

i'm not saying i do all those things....ok, maybe i am just a little.

so in the spirit of timania i am starting my own set of tim inspired tags. i'm not doing a literal one-for-one, but rather creating tags that might be inspired by techniques from a couple of tim's tags. so are you ready gypsies? well here we go!

timaniac tag #1 - inspired by tim's day #1 tag
so my first decision was to not copy the tag, as copying is boring

 so, i started off with one of my newest and most fun techniques - i made sweater letters out of the "noel". for those of you who visited during my "so knotty" tutorials, you'll remember my sweater letters, and i hope you're as excited as i am with the result.
next i added my other favorite new technique - homemade icicles
then i created some paper flowers from tim's cool tape. next i die cut some leaves and then crumpled and inked them for extra gypsiness.
final bits were the reindeer, which cut from a ribbon of them, and the lace at the bottom that i misted with water and then inked with "walnut stain" distress ink. some dabs of gold stickles and we're almost done!
to finish off the tag, i misted and inked some plain white ribbon with "iced spruce" and "festive berries", added some twine and sparkle charms and tied everything together around a glittered twig i stole from a decoration  found around the house.

i really had a lot of fun with this one, and i hope you're now inspired to try your own tag! don't forget to join the party on twitter tonight as we all await tim's #8 tag. and come back tomorrow for my timspired tag #2!

materials used:
"wonder" collection paper - authentique
"maraccinno" twine - the twinery
"iced spruce" and "festive berries" inks - tim's seasonal ink set
tim tape, bits and pieces, this and that
caffeine - starbucks

Saturday, November 26, 2011

so knotty tutorial - sweater letters

welcome back for the very last "so knotty" tutorial. this one is actually my favorite, and it looks like it was a hit with a lot of you gypsies. so hold on to your knitting needles, and away we go!

now, i made xmas letters, but you can use this technique to create letters for any time of year. and the best thing is that you can use any left-over chipboard letters for this.

 i secured the end of the twine with a little dab from the hot glue gun,
to anchor the twine and make it easier to "knit"
 once the anchor point is secure, start wrapping the twine around the letter.
keep wrapping until the entire letter is covered, then use another little dab of hot glue
to secure the end of the twine on the back.

and that's it! really! that's all there is to it.

thanks everyone for coming to the caravan for "so knotty" this month. i hope you've learned some tricks and been inspired. the "so knotty" prize winner will be announced december 1. so make sure to return and find out if you've won, and also to see the first oh-so-jolly xmas project!

Wednesday, November 23, 2011

so knotty tutorial - xmas tag

welcome back gypsies! it's beginning to look a lot like xmas, so what better way to celebrate that to get our hands dirty and make a xmas tag!

this tag has lots of different techniques going on, and using twine is just the icing on the cake. so are you ready gypsies? then hold onto your sleigh bells and away we go!
 so let's start by making our holly and berries. i used tim holtz's "tattered leaves" die and a piece of authentique's "free bird" paper to make the leaves, and chose the twinery's "marachinno cherry" twine, which is an awesome xmas red.
to make the berries, i put a dab of "glue n seal" on a piece of scrap paper, then used my burnisher to hold the twine in the center while i coiled around until i got a berry that i liked. you might need to sculpt a little and flatten a little to get the shape. remember to stay small.
you'll need three berries for the tag. while the berries dried i shaped the leaves by misting them with water and crumpling them up. then i flattened them out and folded each in half, to get the "vein" down the center, and curled the edges a little for a more natural look.
next came the green layer. i took a piece of authentique's "free bird" paper and ran it through my sizzix using an "alterations" texture fold. using ranger ink's acrylic dabber in "pearl", i lightly painted the embossed paper, giving it a metallic look.
next i glued down the leaves and berries to the edge of the card - i like to use a glue gun because i can't stand waiting for glue to dry. once glued in place, i tipped the edges of the leaves and bits of each berry with glossy accent, and then sugared them with twinklets "diamond dust".
while the diamond dust dried, i prepared the tag. cutting a 3 1/2"x6" tag from a piece of authentique's "gathering" collection, i sanded the heck out of the edges, then edged it heavily with both "festive berries" and "evergreen bough" distress inks. lots of blending and layering gave me the vintage color.
once all the pieces were dried and ready, i glued down the green card onto the tag, added a strip of crumpled and inked craft paper, and hand stitched down the card with twine. i used my biggest paper needle and sewed a back stitch.
then it was time for the fun stuff. i took a chipboard scrap and used tim holtz's "fleurish" die to cut a fleurish. i coated the whole with the pearl dabber and glued onto the edge of the tag., the pom-pom trim is from my treasure drawer, and the xmas quote and "to" tag are elements from authentique's "wonder" collection. red stickles adds sparkle to the tree, and of course the edges are all sanded. i used "iced spruce" distress ink on the edges of the xmas quote. a punched hole and some more twine, and the tag is ready to give.
i hope you have been enjoying my "so knotty" tutorials as much as i've enjoyed making them. don't forget to leave your comment below for your chance to win this fabulous prize.
have great journeys this week, and come back to the caravan for the final "so knotty" on nov 26 - "sweater letters"!

Wednesday, November 16, 2011

so knotty tutorial - loop-d-loop card

welcome back gypsies! i hope you've had fair travels so far this week. today's "so knotty" is the "loop-d-loop" card, a variation on the faux spiral notebook. ready? set? away we go!
first off was choosing the materials. for this card i chose some craft paper and some sheets from authentique's "free birds", little 6"x6" sheets you can buy individually for your own matching - sweet! and the twinery's "pink sorbet" is a perfect color match.

the craft paper is the card base, so after cutting it to 6"x 8", i tore 1/4" off the bottom edge of the card front. the floral paper is trimmed to 3"x5". the ledger paper is trimmed to 2"x4", making sure to fit in the watermark of bicycles.
next i pierced all around the edge of the card at 3/8" increments - tim holtz's acrylic ruler is perfect for this by the way, now that he's told me there are piercing holes in the ruler! i also lightly sanded the edges of the card because of course i can't have any plain edges.
using my biggest paper needle, i am able to thread the twine through and sew all the way around the card. i worked very loosely, using my pinkie as the loop guide and adjust as i went.
after lightly inking the edges of the ledger paper with "worn lipstick" distress ink, i layered the card papers and then pressed and flattened the twine loops into place.
and then the final touches - i love this part of the project! this time i chose a selection of random cool words and applied them to card's inside bottom edge, so they show below the torn cover edge. a postage stamp bicycle, circle type and a wheel tied on make for a joyful ride!

i hope today's "knottiness" inspired you, and was as much fun for you to see, as it was for me to make. don't forget to leave a comment below, and return to the caravan on november 19 for the "home sweet home hanger".

remember, every time you visit, you are entered to win this oh-so-knotty prize, so please enjoy your journeys this week, and see you back at the caravan.

Sunday, November 13, 2011

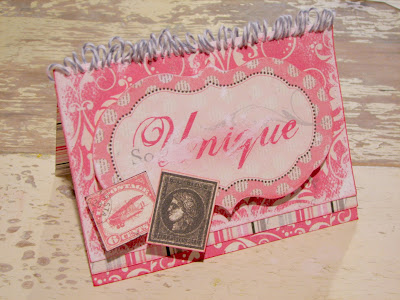
so knotty tutorial - faux spiral notebook card

hello gypsies and welcome to the first "so knotty" tutorial. today i'm showing how to make a faux spiral binding. the project i used this for was a card, but this can also be used in page layouts - think "back to school" - and smaller minibooks as binding instead a coil binding.

so are you ready? well here we go!

 
first i chose something rosey and bright - it's been grey and rainy for days here, and i needed some bloominess. i chose authentique's "uncommon" papers and the twinery's "stone" twine - perfectly matched!
now if you're new to my caravan you should know that i hate clean untouched edges. so after choosing a paper and cutting it to 4"x6", step one is sanding! i sanded down the edges of the papers and the "unique" element. don't be intimidated by sanding - authentique papers are very thick and take a lot of abuse so grind away. {i use a mat to protect my table.}
next i pierced a row of holes along one edge of the card. tim holtz's acrylic ruler is great for this - did you know it has a line of holes along one edge just for this kind of work? i didn't until he told me! for the spiral binding look you'll want to pierce at 1/8" increments.
next i used my biggest paper needle and threaded the twine through, and sewed. i kept the twine very loose, and occasionally adjusted the loops as i went. you can also use a pencil for this part - lay the pencil along the card's edge and sew around it to maintain your "coil".
now that the spiral binding is done, it's time to build the card. i lightly inked the edges of the "unique" element and all of the card papers with "worn lipstick" distress ink.
i selected 2 more pieces of paper for the card's base - one striped piece cut to 4 1/4" x 6", so a little piece of striping shows below the top layer, and one piece 8"x6" folded in half to make the 4"x6" card base. i layered all the papers then set the "unique" element with a double stack of pop-squares for extra height.
final touches are stamps - these are cut from a 12"x12" sheet from the "uncommon" collection, with the edges sanded and inked, of course!

i hope you've been inspired by today's "so knotty" tutorial. make sure to leave a comment below and come back for the next "knottiness" on november 16 - the "loop-d-loop" card. remember, every time you visit and leave a comment, you're entered in the drawing for this fabulous prize!
so enjoy your journeys this week, and see you back at the caravan!

Saturday, November 12, 2011

time to get knotty!


Welcome to the Authentique ~ The Twinery Blog Hop!
Blog Hop Prizes: {*2 total winners*}
From Authentique Paper – Authentique Paper prize pack ($20 retail value)
From The Twinery – Colorful Bunch Sampler Pack ($20 retail value)
To win: Participants should leave a comment on each blog along the hop. (Winner will be chosen randomly from all comments on the manufacturer blogs AND the DT blogs.) {Winner must have a US/Canada address}
Blog Comments Close: Monday, November 14th @ 11:59pm (Pacific)
Winner Announced: Wed, Nov 16th (on Authentique Paper's blog and The Twinery's blog).

Welcome gypsies! You've probably just come from the blog of Deena Neimat. If the gypsy caravan is your first stop, make sure you travel back to the start of the hop at the Authentique blog.

"So Knotty Tutorials"
What would a trip to the gypsy be without fabulous prizes? All month I'll be featuring tutorials on the techniques used today. Every time you stop by and leave a comment, you're entered in the drawing for ... twine from The Twinery, and a Free Bird Nest from Authentique Paper - sweet!
And now fellow gypsies, onward we go!

Faux spiral notebook card - tutorial Nov 13
Loop-d-loop card - tutorial Nov 16
Home Sweet Home hanger - tutorial Nov 19
Xmas tag - tutorial Nov 23
Sweater Letters - tutorial Nov 26
All right gypsies, I hope you found inspiration today. Off you go to visit Ivona Foster and I hope to see you back tomorrow for my first "So Knotty" tutorial!