so are you ready? well here we go!
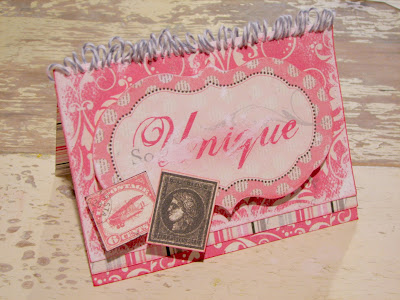
first i chose something rosey and bright - it's been grey and rainy for days here, and i needed some bloominess. i chose authentique's "uncommon" papers and the twinery's "stone" twine - perfectly matched!
now if you're new to my caravan you should know that i hate clean untouched edges. so after choosing a paper and cutting it to 4"x6", step one is sanding! i sanded down the edges of the papers and the "unique" element. don't be intimidated by sanding - authentique papers are very thick and take a lot of abuse so grind away. {i use a mat to protect my table.}
next i pierced a row of holes along one edge of the card. tim holtz's acrylic ruler is great for this - did you know it has a line of holes along one edge just for this kind of work? i didn't until he told me! for the spiral binding look you'll want to pierce at 1/8" increments.
next i used my biggest paper needle and threaded the twine through, and sewed. i kept the twine very loose, and occasionally adjusted the loops as i went. you can also use a pencil for this part - lay the pencil along the card's edge and sew around it to maintain your "coil".
now that the spiral binding is done, it's time to build the card. i lightly inked the edges of the "unique" element and all of the card papers with "worn lipstick" distress ink.
i selected 2 more pieces of paper for the card's base - one striped piece cut to 4 1/4" x 6", so a little piece of striping shows below the top layer, and one piece 8"x6" folded in half to make the 4"x6" card base. i layered all the papers then set the "unique" element with a double stack of pop-squares for extra height.final touches are stamps - these are cut from a 12"x12" sheet from the "uncommon" collection, with the edges sanded and inked, of course!
so enjoy your journeys this week, and see you back at the caravan!


Awesome idea.
ReplyDeleteLove this fun accent with the twine- love the whole project!
ReplyDeleteIsn't this great?! Those papers are so gorgeous too.
ReplyDeleteSuper cool, I love the balance of the project! It's really is great!
ReplyDeleteOh how cute! Don't you love twine? The papers look really cute, too!
ReplyDeleteLove those awesome colors.
ReplyDeleteunique idea
ReplyDeleteWhat a cute idea!
ReplyDeleteSo unique and so fun!! Hmmm...don't have this collection... ;0P
ReplyDeleteOHHH! What a clever idea--love those papers with the grey (or gray) twine! LOVE!
ReplyDeleteNow that is super cool!!! I will hafta give this a try soon.
ReplyDeleteThat's clever and original! Love it!
ReplyDeleteThat is so cute. Loved your tutorial and looking forward to visiting here alot! I sure need some of that twine and that paper! lol
ReplyDeleteJanelle
I enjoyed the tutorial. Also thanks for the description on distressing w/sanding edges, I definitely need to try that.
ReplyDelete